Excel is a powerful tool, but repetitive tasks can slow you down. What if you could automate these tasks with just a click? That’s where macros in Excel come in.
In this Excel macros tutorial, we’ll guide you through the basics, from recording your first macro to editing VBA code, so you can start automating tasks in Excel like a pro.
What are Macros in Excel?
A macro is a recorded set of actions that Excel can replay automatically. Think of it as a personal assistant that handles tedious tasks for you, such as formatting data, generating reports, or cleaning up spreadsheets.
Key points:
- Macros are written in VBA (Visual Basic for Applications), Excel’s programming language.
- They save time, reduce errors, and streamline workflows.
- Even beginners can use macros by recording actions—no coding required. (at first!)
How to Enable the Developer Tab
Before recording a macro, you’ll need to enable the Developer tab in Excel, which houses Excel’s macro tools.
On Windows:
- Go to File → Options → Customise Ribbon.
- Under Main Tabs, check the Developer
- Click OK.
On Mac:
- Open Excel → Preferences → Ribbon & Toolbar.
- Check Developer in the list.
- Close the preferences window.
Now, the Developer tab will appear in your ribbon, giving you access to the macro recorder and VBA Editor.
Step-by-Step: Recording Your First Macro
Let’s record a macro to format overdue invoices in red and bold. This is an excellent way to see how macros work without needing to write any code yourself.
Here’s how to record a macro in Excel:

Record Macro
1. Click Developer → Record Macro.
2. In the “Record Macro” dialogue box, you’ll be prompted to:
- Macro name: Give your macro a descriptive name without spaces (e.g., “FormatOverdue” or “Format_Overdue”). Use underscores if needed.
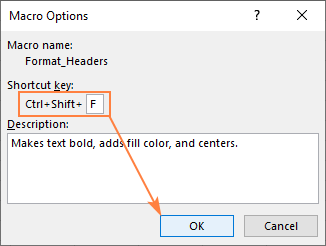
- Shortcut key: Assign an optional keyboard shortcut (e.g., Ctrl+Shift+F). Be careful not to use common Excel shortcuts.
- Store macro in: Choose where to save your macro (This Workbook, New Workbook, or Personal Macro Workbook).
3. Click OK. Excel is now recording your actions!
4. Perform the steps you want to automate. For example, you could select a range of cells, apply a red fill colour, and then make the text bold to format overdue invoices in red and bold automatically.
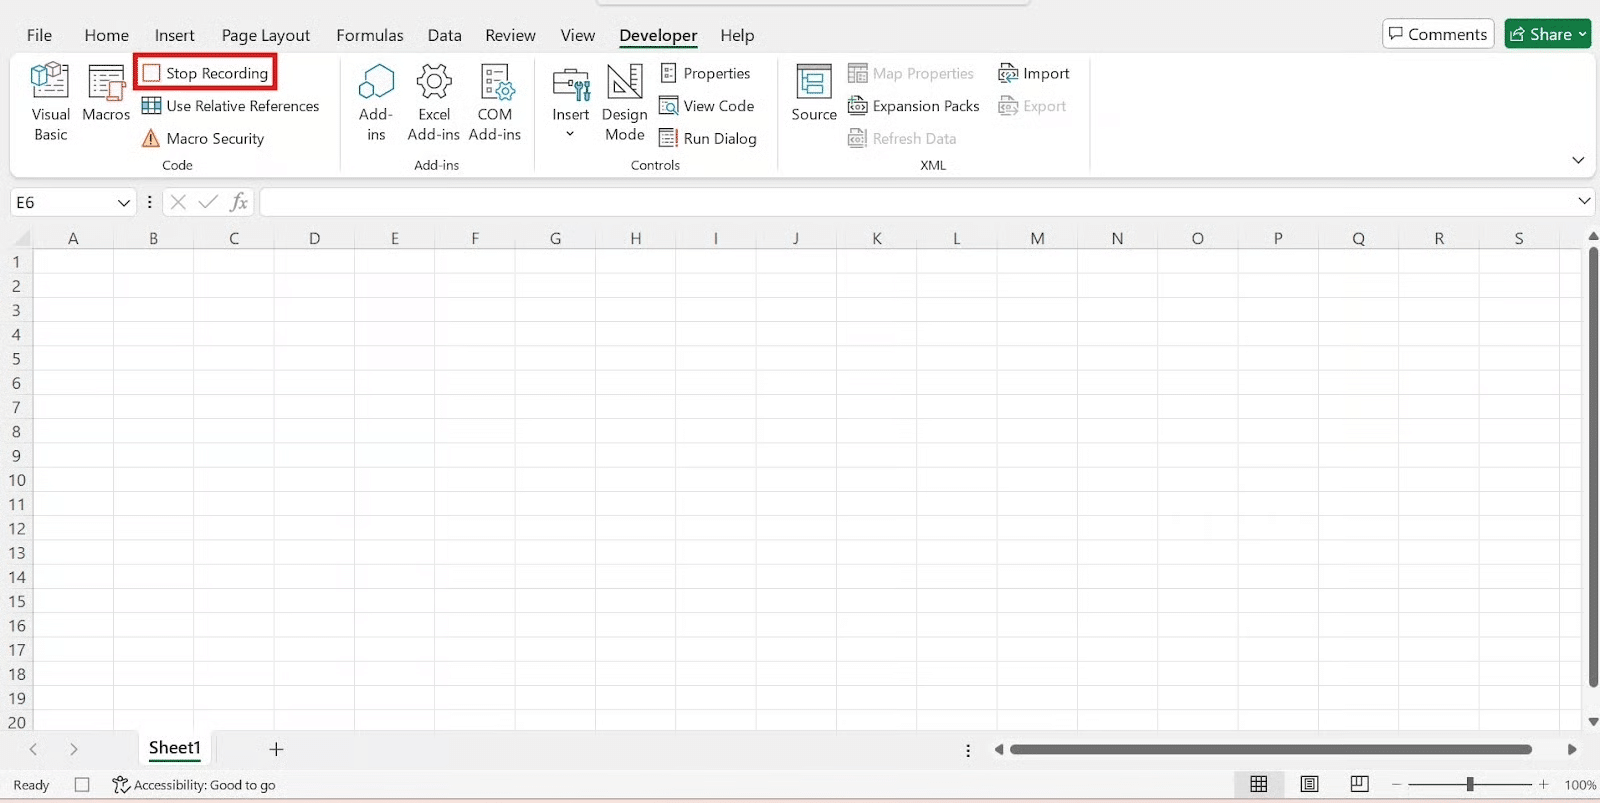
Stop Recording Macro
5. Once you’ve completed all the steps, go back to the Developer tab and click Stop Recording.
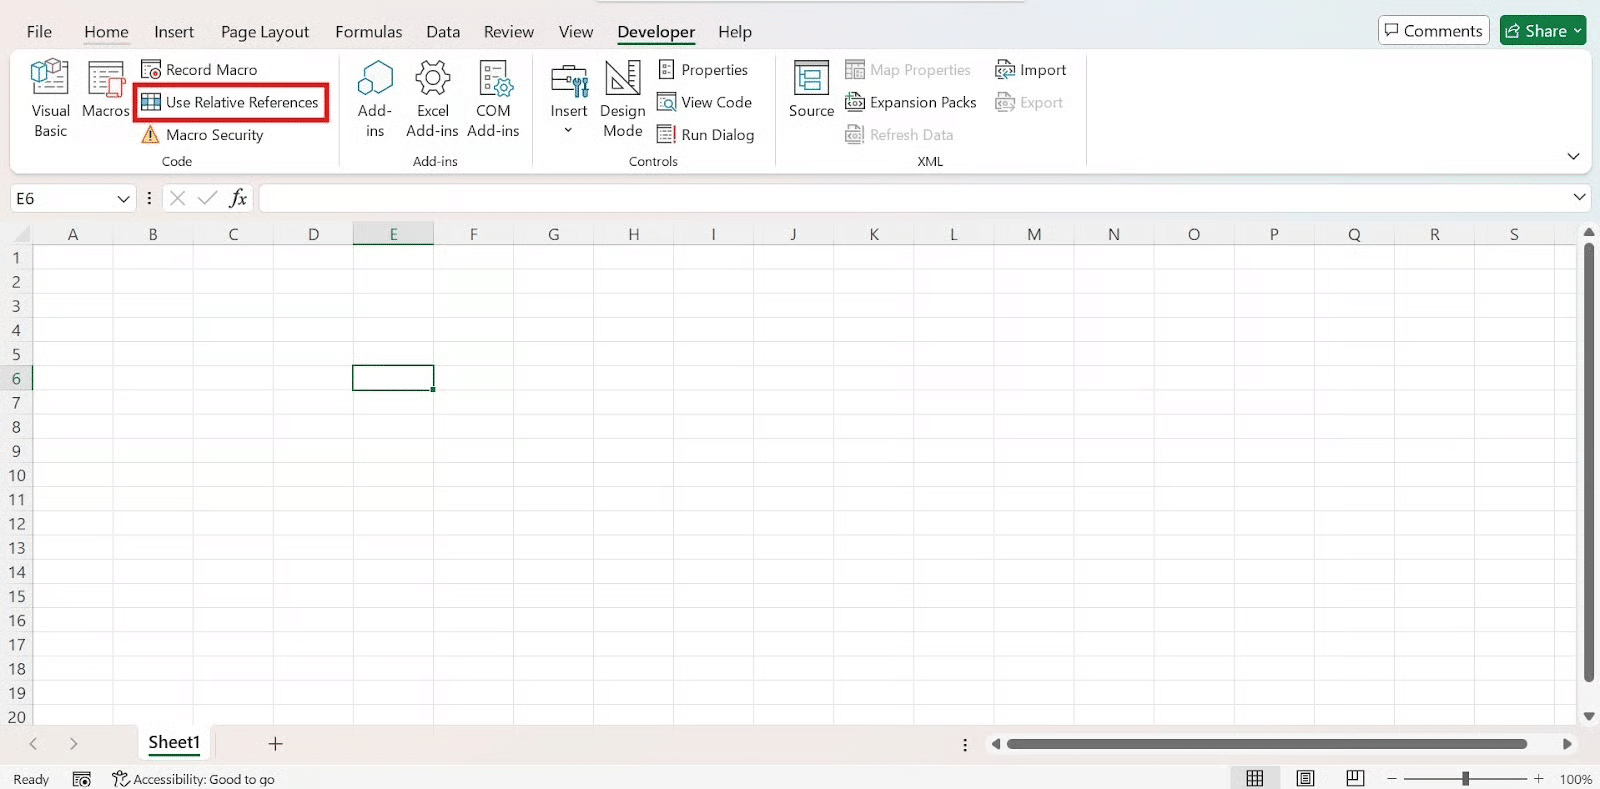
Relative References
Pro Tip: Use Relative References (Developer → Use Relative References) if you want the macro to work on different cell ranges.
Congratulations, you’ve just recorded your first Excel macro!
Running a Macro
Once you’ve recorded a macro, you’ll want to know how to execute it. There are several ways to run a macro you’ve created:
1. From the Developer Tab:
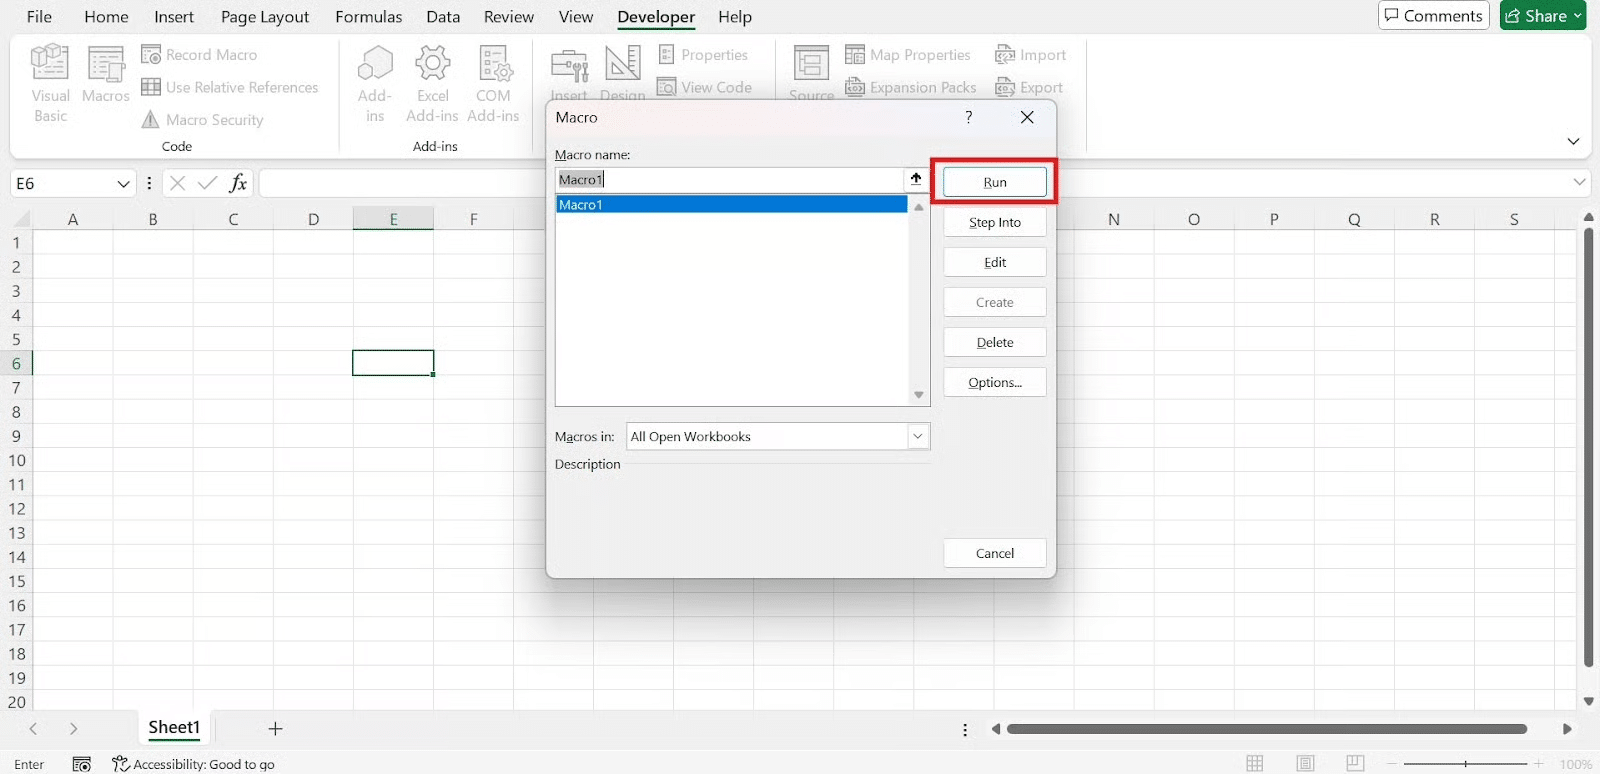
Go to Developer → Macros, select your macro from the list, and click Run.
2. Using a Shortcut Key:
If you assigned a shortcut key, simply press that combination (e.g., Ctrl+Shift+F).
3. Attaching to a Button or Shape:
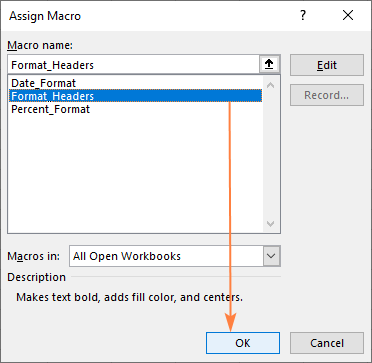
You can insert a shape or button on your worksheet, right-click it, and choose Assign Macro to link it to your recorded macro.
4. From the VBA Editor:
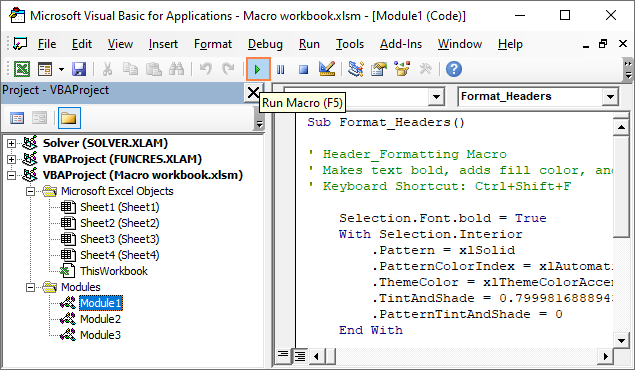
Press F5 within the VBA Editor when your macro’s code module is active.
While running recorded macros is powerful, true customisation comes from understanding the underlying code.
Exploring and Editing the VBA Code
Even if you’re a VBA for beginners, it’s incredibly insightful to explore the code generated by your recorded macro.
This is where the true power of automation lies beyond simple recording.
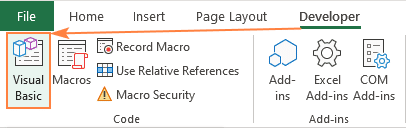
1. To open the VBA Editor, go to Developer → Visual Basic (or press Alt + F11).
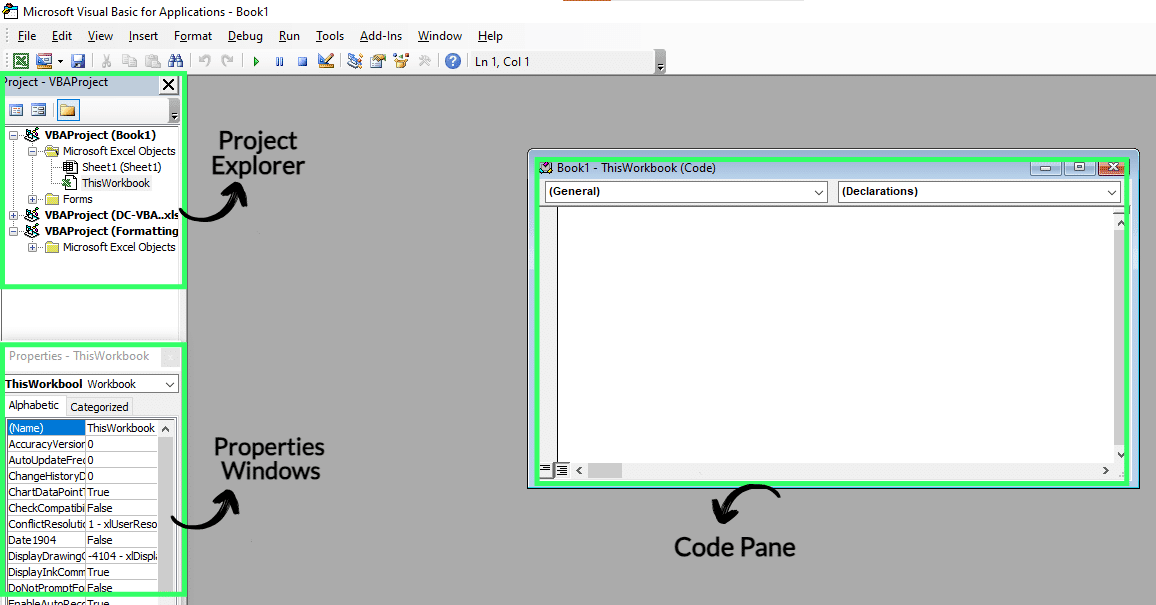
2. In the “Project Explorer” pane on the left, you’ll find “Modules.”
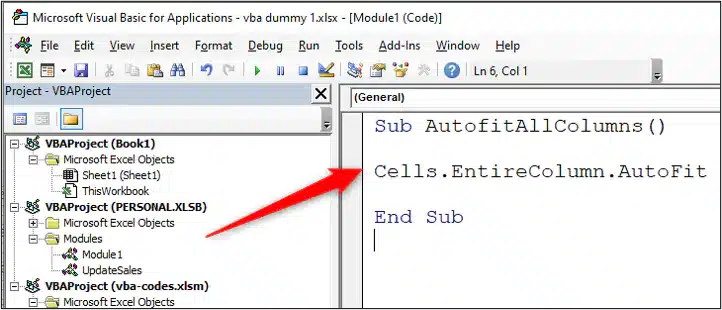
3. Double-click “Module1” (or the relevant module) to see the VBA code for your recorded macro.
You might be surprised at how much code a few simple actions can generate! Don’t be intimidated.
You can start by making small adjustments, such as modifying cell references or adding simple loops to repeat actions.
After putting effort into creating your macros, you’ll want to ensure they’re saved correctly and that your workbook remains secure.
Saving and Macro Security
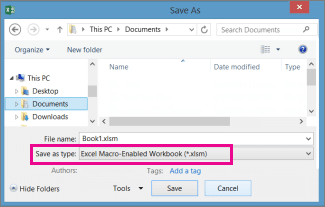
To ensure your macros are saved with your workbook, you must save it as a Macro-Enabled Workbook with the .xlsm file extension. If you save it as a regular .xlsx file, your macros will be lost.
Macro security is crucial. Macros from untrusted sources can potentially contain malicious code that harms your computer or compromises your data.
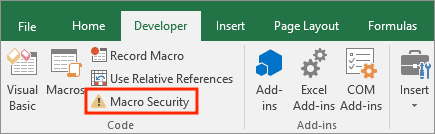
It’s highly recommended to set your macro security to “Disable all macros with notification“.
You can find this setting in File → Options → Trust Centre → Trust Centre Settings → Macro Settings.
This way, Excel will ask you before enabling macros in any downloaded workbook, allowing you to decide whether to trust the source.
Since this is exclusive to newer Windows versions, Mac users can create and save their macros by following the instructions here.
Going Beyond Recording: Writing Simple VBA
While recording macros is a great start, the real magic happens when you begin to understand and write simple VBA code.
This allows you to create more dynamic and powerful automations that aren’t possible with just recording.
Key topics for beginners to explore include:
- Absolute vs. relative references: Understanding how to write code that refers to specific cells (absolute) or cells relative to the current selection (relative).
- The Personal Macro Workbook: This special workbook (PERSONAL.XLSB) allows you to store macros that are available to any workbook you open, making them universal macros.
- Debugging tools: Learn to use tools like breakpoints and step-by-step execution to troubleshoot and fix errors in your VBA code.
Practical Macro Use Cases
To inspire your automation journey, let’s look at some practical Excel macro examples that you can implement in your daily work:
- Formatting Overdue Payments: Automate the process of highlighting overdue invoices in red and bold, as we did in our recording example.
- Splitting Full Names: Create a macro that takes a column of full names and automatically splits them into separate “First Name” and “Last Name” columns.
- Automating Monthly Sales Reports: Develop a macro that compiles data from various sheets, formats it, and generates a summary for your monthly sales reports.
- Adding Macro Buttons: Simplify your workflow by creating custom buttons on your worksheet that execute specific macros with a single click.
Resources for Further Learning
Your journey into Excel macros doesn’t have to stop here! To deepen your knowledge and master VBA, consider these excellent resources:
Websites
- Learn Microsoft
- Excel-Easy.com
- AutomateExcel.com
- Tutorialspoint (for deeper tutorials)
- GeeksforGeeks (for deeper tutorials)
YouTube Tutorials
Final Thoughts
By now, you should have a solid understanding of how to use macros in Excel and why they are invaluable for anyone looking to automate repetitive tasks and enhance their productivity.
The combination of recording your actions and then making simple edits to the generated VBA code empowers you to tailor macros to your precise needs.
Start experimenting with recording your own macros and then dive into the VBA Editor to see the code behind the magic.
With the resources provided, you’re well on your way to becoming an expert in Excel automation!
Ready to Take Your Productivity Further?
Learning how macros can transform your Excel experience is just the beginning. Explore @ASK Training’s range of Microsoft Excel courses from beginner to advanced, helping you master Excel’s full potential:
- Visual Basic for Applications in Microsoft Excel: Learn the Excel programming environment, perfect for beginners.
- WSQ Microsoft Excel Essentials: Gain essential Excel skills for tasks related to data analytics, business, and research.
- WSQ Microsoft Excel Advanced: Dive into advanced skills, including statistical formulas, PivotTables, data queries, and automation.
Enrol with us today! Your future efficient self will thank you!
Related Courses
- Visual Basic for Applications (VBA) in Microsoft Excel – Fundamental
- WSQ Microsoft Excel Essentials
- WSQ Microsoft Excel Advanced
◆◆◆